Help Center
Quick Start:
Welcome to the eSIM Installation Help Center
Getting started with your eSIM is easy! Follow this quick guide to ensure your device meets the requirements and install your eSIM correctly.
System Requirements
Before you begin, make sure your device supports eSIM. View list of supported devices .
- Your phone must be unlocked and compatible with eSIM technology.
- You should have the latest version of the operating system installed.
Quick Installation Guide
- Purchase your eSIM plan through our website or talk to our team on social media.
- Once the purchase is complete, you'll receive an email with a QR code to activate your eSIM.
- Be sure your device is connected to a stable internet connection.
- Open your device’s camera (do not use a QR scanning app) and scan the QR code you received.
- Click on the prompt to install the eSIM and follow the on-screen instructions.
- Once installed, go to your device settings, select the eSIM data plan, and activate roaming if needed.
If you encounter any issues or need further assistance, please review our Help Topics on the left menu bar.
Enjoy your seamless connectivity with XPRESIM!
How to Check if My Device is Unlocked?
Before installing an eSIM, it's important to make sure that your device is unlocked. A locked phone can only work with the carrier that sold you the device. Here’s how you can quickly check whether your phone is unlocked, depending on the brand:
For iPhone Users:
- Open the Settings app.
- Scroll down and tap on General , then About .
- Look for the section labeled Carrier Lock .
- If it says "No SIM restrictions" , your iPhone is unlocked. If it lists a carrier, your phone is still locked to that carrier.
For Android Users (Samsung, Google, etc.):
- Go to Settings .
- Tap on Connections or Network & Internet .
- Look for Mobile Networks and tap on Network Operators .
- If you can select a different network other than your current carrier, your phone is likely unlocked. If not, it may be locked.
- Alternatively, you can insert a SIM card from another carrier. If your phone asks for an unlock code or cannot connect to the new network, it's still locked.
For Other Brands:
For most other devices, the steps are similar to Android phones. You can also try inserting a different carrier’s SIM card to test if the device prompts you for an unlock code.
Why Are Phones Locked by Carriers?
When you purchase a phone from a carrier, they may lock it to their network to ensure you use their services for a certain period. Phones are often locked if you bought the device on a contract or as part of a payment plan.
How to Unlock Your Phone:
To unlock your phone, you’ll need to contact your carrier. Some carriers offer an easy option to unlock phones directly on their website, while others may require you to contact customer service. Here are a few general steps:
- Visit your carrier's website and check if they provide an online tool to unlock your device.
- If no tool is available, call your carrier’s customer service line and request a device unlock.
- Make sure your phone is fully paid off and that you've met all of the carrier's unlocking requirements.
- Once the unlock is processed, restart your phone and insert a SIM card from a different carrier to confirm it's unlocked.
Contacting Your Carrier:
If you're unsure about the unlocking process, or you need assistance, it’s always a good idea to reach out to your carrier directly.
Unlocking your phone ensures you can use it with other carriers and services, including our eSIM!
How to install an eSIM in my iPhone?
Steps to install eSIM on iPhone:
Follow the next steps to install an eSIM on iPhone, QR code activation method. Please notice this method require a second device from where to scan the QR Code (QR code reader apps will not install the eSIM), if you are on the go try manual installation.
QR Code Installation:
1. Open the email sent by hello@xpresim.com after your purchase from other device & look for the QR CODE.
2. Open your phone´s camera app.
3. Scan the QR CODE
4. Tap in the yellow "Cellular Plan" button that prompts on screen.
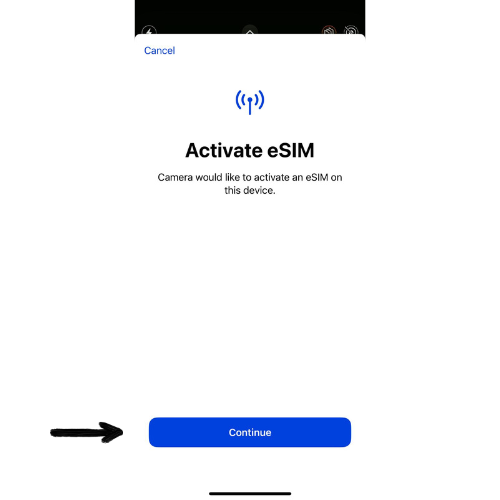
5. When screen prompts "Camera would like to activate an eSIM on this device." Tap Continue.
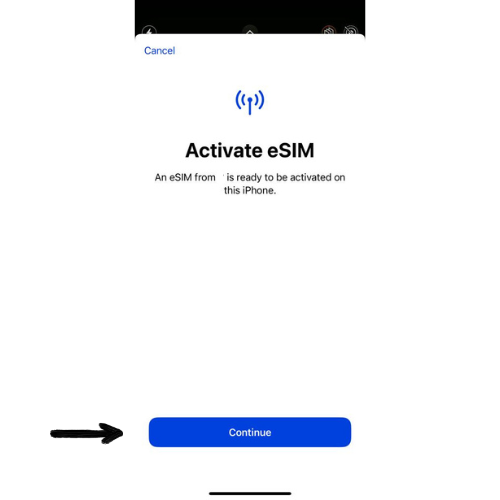
6. When screen prompts "An eSIM of [carrier name] is ready to be activated on this iPhone" Tap Continue Again.
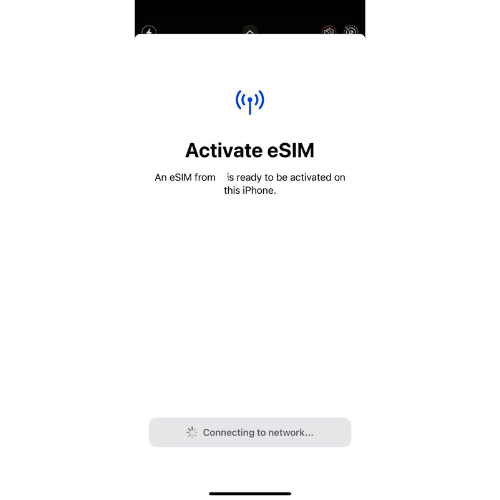
7. Wait for the connection to be established with the network.
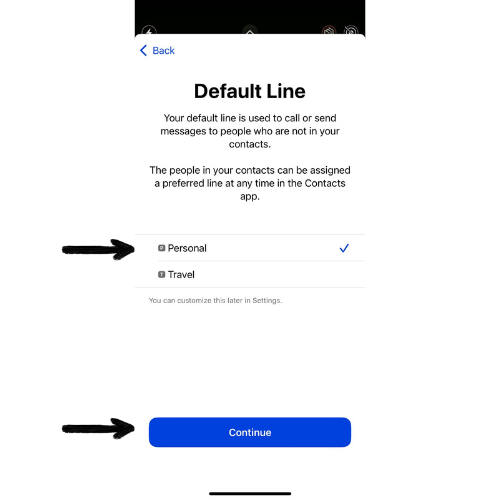
8. Choose your default line (we recommend to chose your personal line, you can change this and each line´s name in cellular settings later).
9. Choose the cellular plan which you will use with iMessage & FaceTime (we recommend to chose your personal line, you can change this in cellular settings later).
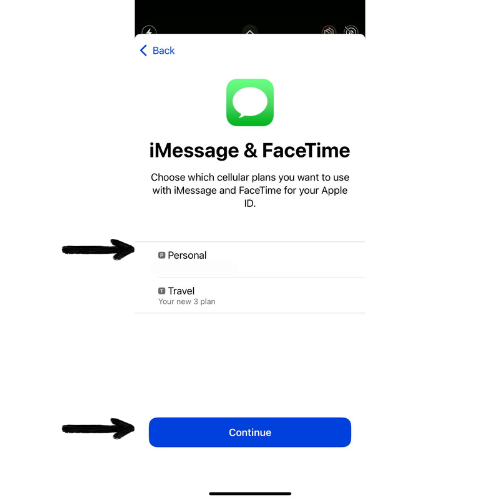
Once your eSIM is successfully installed in your iphone proceed to activate it
How to manually install my eSIM in my iPhone?
Steps to manually install eSIM on iPhone:
Follow the next steps to install an eSIM on iPhone, manual method.
Manual Installation:
1. Open the email sent by hello@xpresim.com after your purchase from other device & locate the manual configuration codes.
2. On your iphone go to Settings / Cellular / Add eSIM.

3. Tap on "Use QR Code".
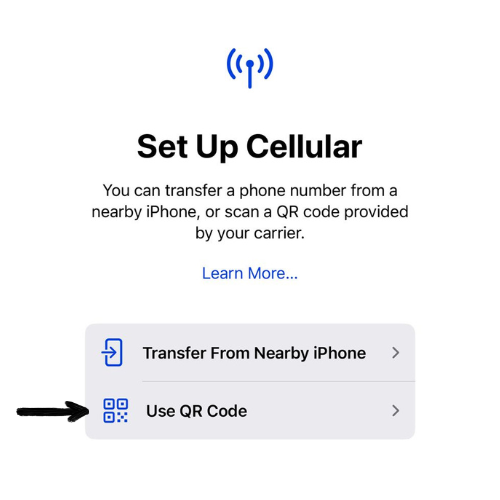
4. Tap "Enter Details Manually".
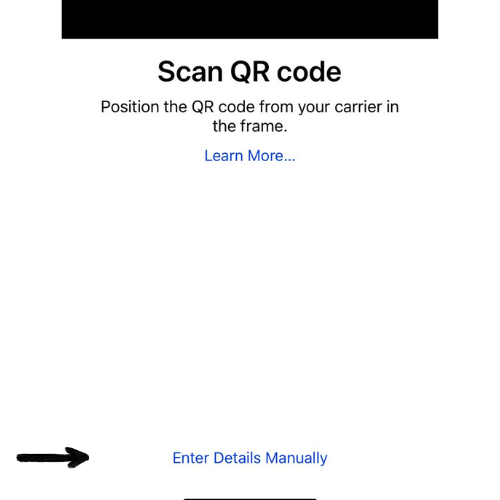
5. Enter the SM-DP+ Address code you get on your email inbox after purchase. (hint: you can copy & paste to avoid typos)
6. In the Activation Code field enter the Matching Id code from the email.
7. If you receive an optional code, enter it in the confirmation code.
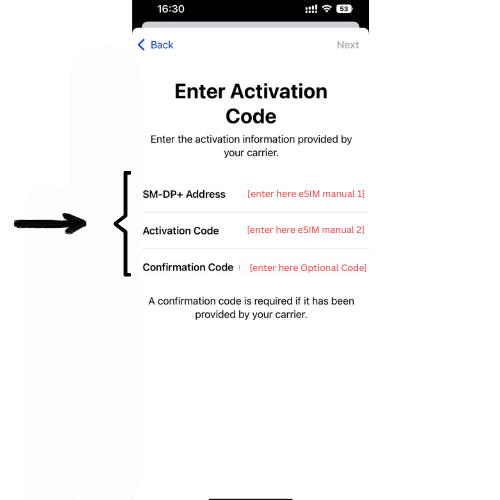
8. Tap "Next".
9. When screen prompts "An eSIM of [carrier name] is ready to be activated on this iPhone" Tap Continue Again.
10. Wait for the connection to be established with the network.
11. Choose your default line (we recommend to chose your personal line, you can change this and each line´s name in cellular settings later).
12. Choose the cellular plan which you will use with iMessage & FaceTime (we recommend to chose your personal line, you can change this in cellular settings later).
13. Congratulations you are online!
How to turn ON my eSIM?
Activation Steps:
1. On your iphone go to Settings / Cellular.
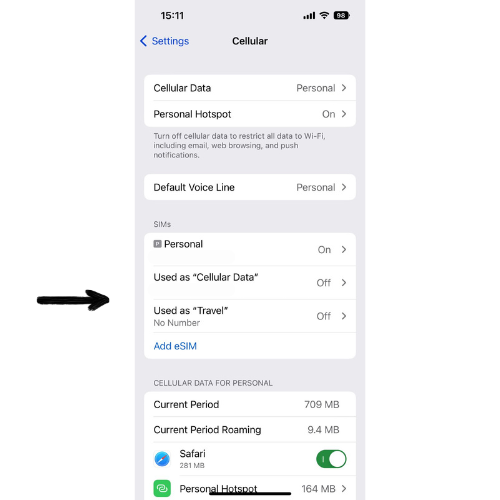
2. The new line should now show under SIMs tap on it.
3. Turn on the line.
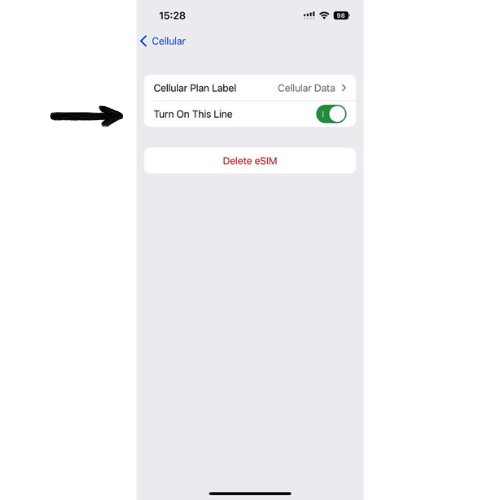
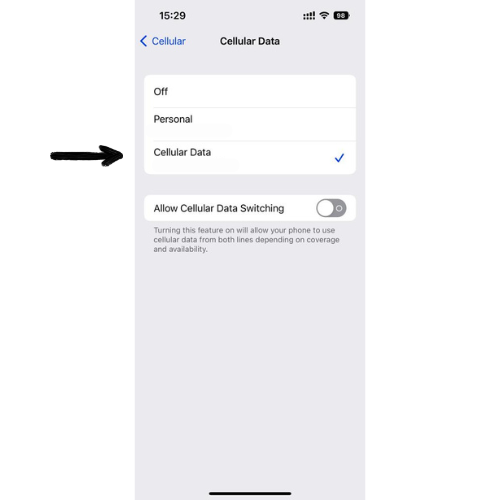
4. Go back to the main cellular settings menu, next tap on "Cellular Data".
5. Select the new data plan from the list a checkmark should appear next to it. Leave "Allow Cellular Data Switching" OFF. Go back to the main cellular settings menu.
6. Tap again on the new eSIM data plan under SIMs and activate "Data Roaming".
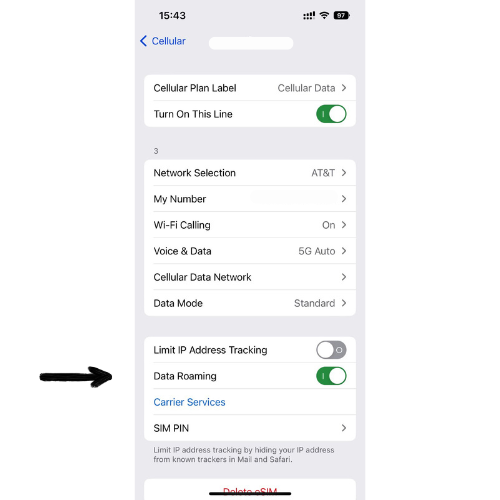
7. Turn OFF your wifi and your Local Personal Line , Settings > Cellular > look for your local SIM line and tap on it, on the next screen leave the "Turn On This Line" option OFF.
How to install my eSIM in my Android device?
Please follow the next steps to install an eSIM on your Android device:
- Check device compatibility to ensure your Android device supports eSIM.
- Select a country and buy a data plan.
- Open your device settings.
- Navigate to "Network & internet" or "Connections".
- Select "Mobile network" or "SIM card & mobile network".
- Choose "Add mobile network" or "Add carrier".
- Select "Scan QR code" or "Enter code manually".
- Scan the QR code or enter the confirmation code.
- Follow the on-screen prompts to activate the eSIM profile.
- Set the eSIM as primary or switch between SIMs as desired.
How to Manually Install eSIM on Android Devices
To manually install your eSIM on an Android device, follow the steps outlined below:
- Step 1: Open Settings
- Step 2: Navigate to Network & Internet
- Step 3: Add an eSIM Profile
- Step 4: Enter Activation Details
- Step 5: Activate eSIM
- Step 6: Set as Primary/Secondary Line
- Step 7: Turn on Data Roaming (if applicable)
From your Android device's home screen, open the Settings app.
Scroll down and tap on Network & Internet or a similar option depending on your device.
Select Mobile Network , then tap on Add Carrier or Add Mobile Plan . Choose the option to manually enter an eSIM.
You will be prompted to either enter the activation code provided by your carrier or scan the eSIM QR code. Choose Enter Details Manually and input the required data.
Once the information is correctly entered, your Android device will automatically activate the eSIM. If prompted, restart your device.
After activation, choose whether to use the eSIM as your primary or secondary data line.
If you're traveling, make sure to enable Data Roaming in the same Mobile Network settings.
How to Manually Install eSIM on Other Devices (iOS, Wearables, etc.)
For devices other than Android, such as iPhones, iPads, or wearables, the manual installation process may differ slightly. Follow these steps:
- Step 1: Open Settings
- Step 2: Access Cellular/Network Settings
- Step 3: Add an eSIM Profile
- Step 4: Enter Activation Code Manually
- Step 5: Activate the eSIM
- Step 6: Verify Connectivity
- Step 7: Enable Data Roaming (if required)
On your device, go to Settings . For wearables like the Apple Watch, navigate to the paired device settings.
In the settings, tap on Cellular (iPhone) or Mobile Data (iPads or other devices).
Select Add Cellular Plan or Add eSIM . You will see an option to scan a QR code or manually enter details.
Choose to Enter Details Manually if you don’t have a QR code. Enter the activation details provided by your carrier.
After inputting the activation code, your device will activate the eSIM automatically. If prompted, restart your device.
Once activated, check that the eSIM shows as active under your cellular settings, and test the connection to verify.
For international travel, make sure to enable Data Roaming in your settings to access mobile data abroad.
How to Turn Off/On Your Local Line
To manage your eSIM and local line, you may need to disable your local line to avoid unnecessary charges or conflicts while using your eSIM. Follow the instructions for your device below:
1. iPhone (iOS)
- Go to Settings on your iPhone.
- Select Cellular or Mobile Data .
- Under Cellular Plans , find your local line.
- Toggle Turn Off This Line to disable your local SIM.
- To turn it back on, follow the same steps and toggle Turn On This Line .
2. Android Devices (Samsung, Google, etc.)
- Go to Settings on your Android device.
- Select Connections or Network & Internet depending on your device.
- Tap SIM Card Manager or SIM Cards .
- Find your local SIM and toggle Disable to turn it off.
- To turn it back on, toggle Enable in the same menu.
3. Windows Phone
- Open Settings on your Windows Phone.
- Go to Network & Wireless .
- Select Cellular & SIM .
- Find your local SIM card and tap Turn Off SIM .
- To turn it back on, select Turn On SIM .
4. Dual SIM Phones (General)
- On most dual SIM devices, go to Settings .
- Select SIM Card Manager or SIM Cards .
- Choose your local SIM and toggle Off or On as needed.
Disabling your local line ensures that your eSIM is the active line for data usage. You can reactivate your local line at any time by reversing the steps above.
Why Disable Your Local Line?
Turning off your local SIM can help prevent additional charges and ensure that your eSIM is used for data and roaming services. You can still switch back to your local line if needed, depending on your travel plans or service availability.
How to Activate Data Roaming on My Device
How to Activate Data Roaming on My Device
To use your eSIM or mobile plan while traveling, you need to ensure data roaming is enabled on your device. Follow the steps below for your specific device:
1. iPhone (iOS)
- Go to Settings on your iPhone.
- Select Cellular or Mobile Data .
- Tap on Cellular Data Options .
- Turn on Data Roaming .
- If you use dual SIM, make sure the correct line for your eSIM is selected.
2. Android Devices (Samsung, Google, etc.)
- Go to Settings on your Android device.
- Select Connections or Network & Internet (depending on your phone).
- Tap on Mobile Networks or SIM Cards .
- Find the Data Roaming option and turn it on.
- For dual SIM devices, ensure the correct SIM is selected for data roaming.
3. Windows Phone
- Open Settings on your Windows Phone.
- Navigate to Network & Wireless .
- Select Cellular & SIM .
- Find the Data Roaming Options and select Roam .
4. Other Devices (Tablets, Hotspots, etc.)
- For most tablets and mobile hotspots, data roaming can be found under Settings > Mobile Networks or Cellular .
- Enable Data Roaming from there.
Why Enable Data Roaming?
Data roaming allows your phone to connect to networks outside your home country, enabling you to use mobile data while traveling abroad. If data roaming is off, you won’t be able to access mobile data services unless you’re connected to a Wi-Fi network.
Contact Us
If you encounter issues with data roaming, contact out tech support team, we are always happy to assist you.
How to Turn On/Off "Allow Cellular Data Switching"
Prevent your phone from using your local line while abroad.
Follow the steps below to turn off "Allow Cellular Data Switching" on your device:
iPhone (iOS)
- Step 1: Open Settings
- Step 2: Go to Cellular (or Mobile Data)
- Step 3: Disable "Allow Cellular Data Switching"
- Step 4: Confirm Action (if prompted)
On your iPhone's home screen, tap the "Settings" icon to access the settings menu.
In the Settings menu, look for the "Cellular" or "Mobile Data" option and tap on it to access cellular data settings.
Scroll down to find the "Allow Cellular Data Switching" option. Toggle the switch next to it to turn it off. The switch should no longer be green when disabled.
Note: The exact wording and location of this option may vary depending on your iPhone model and iOS version.
Some devices might ask for confirmation before disabling the option. If prompted, confirm the action to proceed.
Android (Samsung, Google, etc.)
- Step 1: Open Settings
- Step 2: Go to Connections or Network & Internet
- Step 3: Disable "Allow Allow Data Switching"
- Step 4: Confirm Action (if prompted)
On your Android device, tap the "Settings" icon to open the settings menu.
In the Settings menu, select "Connections" or "Network & Internet," depending on your device.
Find the "SIM Card Manager" or "Mobile Network" section, and look for the "Auto Data Switching" option. Toggle it off to prevent cellular data switching between SIMs.
Note: The wording and location of this setting may vary by device and Android version.
If prompted, confirm your choice to disable the "Allow Cellular Data Switching" feature.
Dual SIM Phones (Generic)
- Step 1: Open Settings
- Step 2: Go to SIM Card Manager or Cellular
- Step 3: Turn Off "Allow Cellular Data Switching"
- Step 4: Confirm Action (if prompted)
Navigate to the "Settings" menu on your device.
Find the "SIM Card Manager" or "Mobile Network" section, depending on your device's interface.
Look for the "Allow Cellular Data Switching" or "Data Switching" option. Toggle it off to prevent automatic switching between SIMs.
Note: Not all dual SIM phones have this feature, and its location may vary.
Confirm the action if your phone prompts you to do so.
Disabling cellular data switching helps ensure that your device only uses the selected SIM for data services while roaming, avoiding unexpected charges from your local line.
How to Turn Off Apps
Prevent idle apps from using your data.
If you want to prevent apps from using your mobile data and save on data usage, follow these steps:
For iPhone Users:
- Open the "Settings" app on your iPhone.
- Tap on "Cellular" or "Mobile Data."
- Scroll down to see the list of apps under the "Cellular Data" or "Mobile Data" section.
- Toggle off the switch next to the app to prevent it from using mobile data.
For Android Users:
- Select "Network & internet" or "Connections" (depending on your device).
- Tap on "Data usage" or "Data usage control."
- Choose "Mobile data usage" or "Mobile data" to see the list of apps using data.
- Select the app you want to restrict from using data.
- Toggle off the switch next to the app to disable it from using mobile data.
Please note that by turning off mobile data for certain apps, they may not function properly when you are not connected to Wi-Fi. If you encounter any issues, you can always re-enable data access for the app using the same steps.
If you have any further questions or need assistance, don't hesitate to contact our support team at hello@xpresim.com .
How to Turn Off Apps
How to Monitor Your Data Usage on Your Phone
Monitoring your data usage can help you avoid unexpected overage charges. Here's how to do it:
For iPhone Users:
- Open the "Settings" app on your iPhone.
- Tap on "Cellular" or "Mobile Data."
- Scroll down to view your data usage and call time under the "Cellular Data Usage" or "Cellular Data Statistics" section.
- Reset the usage statistics at the beginning of your billing cycle or any specific period by tapping "Reset Statistics." This will give you a clearer picture of your data usage during that time frame.
- Consider using a third-party data usage monitoring app from the App Store for more detailed tracking and features.
For Android Users:
- Open the "Settings" app on your Android device.
- Select "Network & internet" or "Connections" (depending on your device).
- Tap on "Data usage" or "Data usage control."
- You'll see a graph displaying your data usage for a specific period. You can adjust the period by tapping on it.
- Scroll down to view a list of apps and their respective data usage.
- Set a data usage limit or warning by tapping on "Set data warning" or "Set data limit." You can customize these limits to suit your needs.
By monitoring your data usage regularly, you can stay in control of your mobile data and make informed decisions about your data plan.
If you have any further questions or need assistance, don't hesitate to contact our support team at hello@xpresim.com .
How to Save Data while travelling?
Some Basic Tips:
When you're traveling, staying connected to the digital world is important, but managing your data usage becomes crucial to avoid hefty bills or slow internet speeds. Whether you have an iPhone or an Android device, there are several steps you can take to conserve your data while on the go. In this article, we will explore some essential tips to help you save data on your mobile device.
1. Turn off Automatic App Updates
One of the biggest data drainers is automatic app updates. Disable this feature to prevent apps from updating in the background and consuming your valuable data.
- On iPhone: Go to Settings > App Store, and toggle off "App Updates" under the Automatic Downloads section.
- On Android: Open the Google Play Store, tap the Menu icon, go to Settings > Auto-update apps, and select "Don't auto-update apps."
2. Disable Background App Refresh
Background app refresh allows apps to update their content even when you're not actively using them, but this can eat up your data. Here's how to disable it:
- On iPhone: Navigate to Settings > General > Background App Refresh, and either turn it off entirely or choose specific apps that you want to allow background refresh for.
- On Android: Go to Settings > Apps & notifications > [App Name] > Data usage > Background data, and disable the toggle switch for each app you want to restrict.
3. Utilize Offline Maps
Instead of relying on online navigation apps, consider downloading offline maps before you embark on your journey. Apps like Google Maps and Apple Maps offer the option to download specific maps for offline use. This way, you can navigate without using your mobile data.
4. Optimize Streaming Settings
Streaming media content can consume substantial amounts of data. Adjust the streaming quality to a lower resolution or download videos and music in advance for offline playback. Popular streaming apps often provide options to adjust quality settings or download content for offline use.
5. Enable Data Saver Mode
Both iOS and Android offer data-saving features that reduce data usage by limiting background processes and optimizing data usage. Here's how to enable them:
- On iPhone: Go to Settings > Cellular > Cellular Data Options > Low Data Mode, and toggle it on.
- On Android: Head to Settings > Network & internet > Data usage > Data Saver, and turn on the toggle switch.
6. Disable Automatic Video Playback
Many apps automatically play videos as you scroll, consuming your data without your knowledge. Prevent this by disabling automatic video playback in various apps, such as social media platforms. Look for settings related to video autoplay and turn them off.
7. Limit Photo and Video Uploads
Uploading high-resolution photos or videos while traveling can quickly consume your data allowance. Adjust your settings to prevent automatic uploads to cloud services or social media platforms. Instead, wait until you have access to a Wi-Fi network to upload your media files.
8. Monitor Data Usage
Keep an eye on your data consumption regularly. Both iPhone and Android devices have built-in data tracking features that allow you to monitor your usage. Set up data alerts or billing cycle limits to receive notifications when you're approaching your data limit.
| App | Average Data Usage per Hour | Approximate Usage with 1 GB of Data |
|---|---|---|
| Streaming Video | 1.5 GB - 3 GB | 20 minutes - 40 minutes |
| Music Streaming | 50 MB - 150 MB | 6 hours - 20 hours |
| Email (with text) | 10 KB - 50 KB | 20,000 - 100,000 emails |
| 1 MB - 5 MB | 200 - 1,000 messages | |
| 2 MB - 10 MB | 100 - 500 minutes | |
| Snapchat | 20 MB - 30 MB | 33 - 50 minutes |
| Instagram Reels | 5 MB - 10 MB | 100 - 200 minutes |
| Spotify | 50 MB - 100 MB | 10 - 20 hours |
| Google Maps | 5 MB - 20 MB | 50 - 200 minutes |
| Uber | 2 MB - 5 MB | 200 - 500 rides |
| Didi | 3 MB - 10 MB | 100 - 333 rides |
| Apple Maps | 5 MB - 15 MB | 66 - 200 minutes |
| YouTube | 1 GB - 3 GB | 20 minutes - 60 minutes |
Conclusion:
By implementing these tips, you can effectively conserve your data while traveling with your iPhone or Android device. From managing app updates and background processes to optimizing streaming settings and utilizing offline maps, these strategies will help you stay connected without exceeding your data limits or incurring additional charges. Enjoy your trip while staying connected wisely!
ESIM Supported devices
APPLE:
- iPhone 15 Pro Max
- iPhone 15 Pro
- iPhone 15 Plus
- iPhone 15
- iPhone 14 Pro Max
- iPhone 14 Pro
- iPhone 14 Plus
- iPhone 14
- iPhone 13 Pro Max
- iPhone 13 Pro
- iPhone 13 mini
- iPhone 13
- iPhone 12 Pro Max
- iPhone 12 Pro
- iPhone 12 mini
- iPhone 12
- iPhone 11 Pro Max
- iPhone 11 Pro
- iPhone 11
- iPhone XS
- iPhone XS Max
- iPhone XR
- iPhone SE 3 (2022)
- iPhone SE 2 (2020)
- iPad Pro 11" (1st Gen or later)
- iPad Pro 12.9" (3rd Gen or later)
- iPad Air (3rd Gen or later)
- iPad (7th Gen or later)
- iPad mini (5th Gen or later)
Google:
- Google Pixel 8 Pro
- Google Pixel 8
- Google Pixel Fold
- Google Pixel 7a
- Google Pixel 7 Pro
- Google Pixel 7
- Google Pixel 6 Pro
- Google Pixel 6
- Google Pixel 6a
- Google Pixel 5
- Google Pixel 4
- Google Pixel 4a
- Google Pixel 4 XL
Huawei:
- Huawei P40
- Huawei P40 Pro
- Huawei Mate 40 Pro
Motorola:
- Motorola Razr
- Motorola Razr 5G
- Motorola RAZR 40
- Motorola RAZR 40 Ultra
- Motorola EDGE 40 Pro
- Motorola G53 5G
Nokia:
- Nokia G60 5G
- Nokia X30 5G
- Nokia XR21
Nuu:
- X5
Oppo:
- Oppo Find N2 Flip
- Oppo Find X3 Pro
- Oppo Find X5
- Oppo Find X5 Pro
- Oppo Reno 5 A
- Oppo A55s 5G
Samsung:
- Samsung Galaxy Fold
- Samsung Galaxy Note20
- Samsung Galaxy Note20 Ultra
- Samsung Galaxy S23
- Samsung Galaxy S23+
- Samsung Galaxy S23 Ultra
- Samsung Galaxy S22
- Samsung Galaxy S22+
- Samsung Galaxy S22 Ultra
- Samsung Galaxy S21 5G
- Samsung Galaxy S21+ 5G
- Samsung Galaxy S21 Ultra 5G
- Samsung Galaxy S20
- Samsung Galaxy S20+
- Samsung Galaxy S20 Ultra
- Samsung Galaxy Z Flip
- Samsung Galaxy Z Fold 2
- Samsung Galaxy Z Fold 3 5G
- Samsung Galaxy Z Fold 4
- Samsung Galaxy Z Fold 5
- Samsung Galaxy Z Flip 3 5G Fold
- Samsung Galaxy Z Flip 3 5G
- Samsung Galaxy Z Flip 4
- Samsung Galaxy Z Flip 5
Sharp:
- Aquos Sense 4 lite
- Aquos Sense 7
Sony:
- Xperia 10 III Lite
- Xperia 1 IV
- Xperia 5 IV
- Xperia 10 IV
- Xperia 1 V
- Xperia 5 V
- Xperia 10 V
Surface:
- Surface Duo
Xiaomi:
- Xiaomi 12T Pro
- Xiaomi 13
- Xiaomi 13 Lite
- Xiaomi 13 Pro
LAPTOPS:
Acer:
- Acer Spin 7
- Acer Swift 3
- Acer Swift 7
- TravelMate P2
- TravelMate Spin P4
- TravelMate P6
Asus:
- Asus Mini Transforme T103HAF
- Asus NovaGo TP370QL
- Asus Transbook Mini
- Asus VivoBook Flip 14 TP401NA
Dell:
- Dell Latitude 7210
- Dell Latitude 9410
- Dell Latitude 9440
- Dell Latitude 7310
- Dell Latitude 7320
- Dell Latitude 7410
- Dell Latitude 9420
- Dell Latitude 9510
- Dell Latitude 5410
- Dell Latitude 5420
- Dell Latitude 5411
- Dell Latitude 5511
HP:
- HP Elite Dragonfly G2
- HP Elite Folio 13
- HP Elitebook G5
- HP Probook G5
- HP Zbook G5
- HP Spectre Folio 13
- HP Spectre x360
Lenovo:
- ThinkPad X1 Titanium Yoga 2 in 1
- ThinkPad X1 Carbon Gen 9
- ThinkPad X1 Fold
- ThinkPad X1 Nano
- ThinkPad X12 Detachable
- Lenovo Ideapad Flex 5G
- Lenovo Yoga C630
- Lenovo Miix 630
- Lenovo X1 Fold
- Lenovo Yoga 520
- Lenovo Yoga 720 convertible laptops
Panasonic:
- Panasonic Toughbook G2
Samsung:
- Samsung Galaxy Book 2
- Samsung Galaxy Book 3
Surface:
- Surface Pro 9
- Surface Pro 8
- New Surface Pro 7+
- Surface Go 2
- Surface Pro LTE
- Surface Pro X
- Surface Pro 5 LTE Advanced
How to Change My Password?
Keeping your account secure is important. If you need to change your password, follow the simple steps below to update it in your XPRESIM console:
- Step 1: Log into Your Account
- Step 2: Navigate to Account Settings
- Step 3: Select 'Change Password'
- Step 4: Enter and Confirm Your New Password
- Step 5: Save Your Changes
Go to the XPRESIM console and log in using your current credentials.
Once logged in, head over to Settings > Account to find your account preferences.
In the account settings, you will see an option for Change Password . Click on it to proceed.
Type your new password in the required field and confirm it by entering it again. Make sure to choose a strong password that includes a mix of uppercase and lowercase letters, numbers, and symbols for added security.
Finally, click Save to update your password. Your new password will take effect immediately.
How to Add Data to My eSIM?
To add data to your existing eSIM, simply use the same email you used for your initial eSIM purchase. The new data plan will automatically be added to your eSIM, without the need to log in or take additional steps.
Alternatively, you can log in to your XPRESIM account, go to the Data Plans section, select Add Data , and follow the prompts to manually add more data to your eSIM.
Note: If you use the same email as your initial eSIM purchase, the data will be automatically added to the existing eSIM profile.
I forgot my password, what should I do?
If you've forgotten your password, follow these steps to reset it:
- Go to xpresim.com/login .
- Click on Get a recovery link located on the login page.
- Enter your registered email address.
- Check your email inbox for a password reset link.
- Follow the instructions in the email to reset your password.
Make sure to check your spam or junk folder if you don't see the recovery email in your inbox.
How to Sign In to XPRESIM Members Console?
Visit the XPRESIM website, click Sign In , fill in your email and password.
Important Notice:
- Remember to TURN OFF your local carrier line when traveling abroad.
- We would like to emphasize that we are NOT responsible for any charges incurred by your local carrier. Our eSIM work independently, and it is your responsibility to ensure that the line is correctly turned OFF when not in use.
- Disable your personal line in Settings -> Cellular -> Select your personal number and deactivate it. See all actitvate/deactivate instructions.
- For additional security against unexpected charges from your local carrier, remove the SIM. (Be sure to store it in a safe space)
- The service operator should always display as XPRESIM.
